

This post contains affiliate links.
When embarking on a camping adventure, knowing how to keep your food cool and safe to consume is crucial. Proper food storage and cooling techniques prevent spoilage and maintain food quality.
The most frustrating part of camping is keeping food cool. Nobody wants to throw food in the bin because it has defrosted quickly, a soggy mess as the ice has melted. Or worse, food poisoning, which always worries me.
How do you keep food cold for camping?
Here are some of our tips for keeping food cooler for extended periods.
- Use campsite freezer fridge
- Pre-cool passive and electrical coolboxes
- Prepare and freeze food in advance
- Convert a storage box or bucket into a coolbox
- Leave perishable food at home
- Prepare a meal plan and pack in order
- Create layers and sections
- Place food in sealed bags
- Increase insulation with newspaper
- Use the correct size coolbox for your trip
- Store in the shade
- Use more than one coolbox
- Keep coolboxes cool whilst travelling
- Upgrade insulated in an old coolbox
The correct and safe temperature for storing fresh and frozen food
Knowing the correct storage temperature for fresh and frozen food is vital to ensure food safety and prevent the growth of harmful bacteria. However, when you are camping, it can be difficult to store food at the desired temperatures. Use the on-site fridge or freezer facilities if you cannot store food correctly.
Perishable food storage temperature – According to UK government guidelines, perishable foods should be stored at 8°C (46°F) or below. This temperature range helps inhibit the growth of bacteria and keeps the food safe for consumption. To maintain their freshness and quality, it is crucial to refrigerate perishable items.
Frozen food storage temperature – The recommended storage temperature for frozen foods is -18°C (0°F) or below. Freezing food at this temperature prevents the growth of bacteria, ensuring that the food remains safe to eat even after an extended period. It is important to set your freezer at the appropriate temperature and regularly check its performance to maintain optimal freezing conditions.
Impact of improper storage temperatures – When perishable foods are stored between 8°C (40°F) and 60°C (140°F), bacteria can multiply rapidly. Bacteria can double in number every 20 minutes within this temperature danger zone. This significantly increases the risk of foodborne illnesses, such as food poisoning. Storing perishable foods at or below the recommended temperature is essential to prevent bacterial growth.
While camping, keeping food stored correctly is hard if you do not have a coolbox. Passive cool boxes must be rotated with freeze blocks, and electrical coolboxes must be switched. Read our guide for the different types of cool boxes available and why we recommend having two cool boxes, one for everyday usage and another for frozen foods.
To avoid wasting food, I also research the area before booking to see if any local stores are nearby. I can then buy food for an average of two days. Not only does this support local businesses, but it helps to save money. Read our article for more tips for not wasting food, saving money and keeping food safe.
1 – Make the most of campsite facilities for food storage
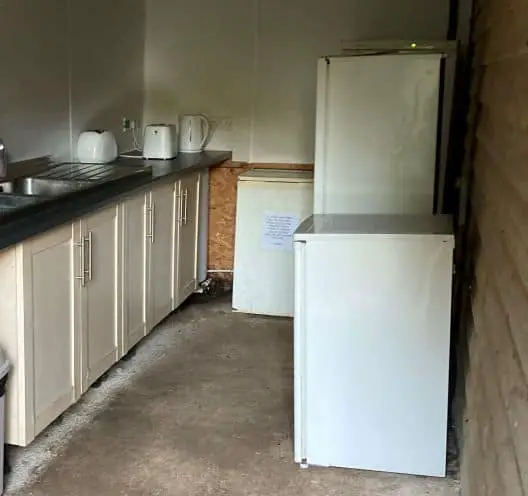
Many campsites have got you covered when it comes to keeping your food chilled during your camping adventure. Around 80% of campsites offer freezer facilities or fridges at no extra cost. However, it’s important to note that these facilities are primarily intended for refreezing ice blocks rather than long-term food storage.
Here are some tips to help you make the most of campsite facilities for food storage:
- Pack and label with care – When using the campsite facilities, it’s a good practice to pack your food items inside sealed bags and label them with your name. This helps to identify your belongings and ensures that your items don’t get mixed up with those of other campers.
- Know the freezer schedule – Campsite owners typically empty the freezers weekly, usually on a Friday morning or afternoon. To avoid any surprises, it’s advisable to check with the campsite owner about their freezer maintenance schedule before storing your food.
- Smart freezing techniques – To optimize your use of the freezer facilities, consider these smart freezing techniques. One option is to store ice blocks or bottles of water in the freezer and rotate them daily. Small water bottles filled with water and frozen can be a cost-effective alternative to buying ice blocks. These frozen water bottles not only keep your food cool but can also be used as a source of drinking water as they gradually melt.
- Utilize ice trays – If freezer space is limited, another handy tip is to freeze ice cubes in ice trays. Once frozen, transfer the ice cubes into sealed bags. These ice cubes can fill any coolbox gaps, providing additional cooling power.
2 – Pre cooling passive and electric coolboxes before using
Both passive and electrical cool boxes need to chill before use. Placing food inside a non-cooled coolbox defeats the reason for using it, as food will warm the inside.
Chilling methods
- Passive cool bags – Place the cool bag inside the freezer the day before using it. This will ensure the bag is adequately chilled and ready to keep your items cool during your camping trip.
- Hardshell coolboxes (Passive and Electrical) – Place bottles of frozen water or ice packs inside the coolbox the day before you need to use it. This pre-chilling process will help maintain lower temperatures inside and enhance the coolbox’s cooling performance.
Proper Storage
- Find a cool area – Store your coolbox in the coolest area of your tent or in a shaded outdoor spot, especially if the temperatures are below freezing. This will help maintain the desired temperature and prevent excessive warming of the contents.
- Keep the lid closed – It’s crucial to keep the lid of your coolbox closed as much as possible. Opening the lid frequently allows warm air to enter, causing the temperature inside to rise and potentially spoil your perishable items.
Additional tips for electrical coolboxes
- Switch on in advance – Turn on your electrical coolbox approximately 2 to 3 hours before you plan to leave. This allows enough time for the coolbox to reach the desired temperature before you pack it with your chilled items.
- Avoid pouring cold water – While some may suggest pouring cold water into a coolbox to expedite chilling, this method is not recommended, especially for electrical coolboxes. It can lead to difficulty drying the box thoroughly and pose safety risks.
By following these simple tips for chilling and storage, you can maximize the performance of your coolbox during your camping trips. Properly chilling your coolbox, utilizing frozen water or ice packs, and storing it in cool areas will help maintain lower temperatures inside. Remember to keep the lid closed as much as possible to prevent warm air from entering. For electrical coolboxes, switch them on in advance to ensure they are properly cooled before packing.
3 – Maximizing food preservation: The power of freezing
When it comes to camping trips, freezing your food in advance can be a game-changer. It saves you time and helps extend your food’s lifespan during outdoor adventures.
- Pre-freezing for longer-lasting food – To get the most out of your coolbox and keep your food fresh for an extended period, it’s crucial to pre-freeze your meals at least two days before your camping trip. Doing so ensures that the frozen items act as ice packs, helping maintain the desired temperature inside your coolbox.
- Passive vs electric coolboxes – It’s important to note that frozen food will defrost faster in a passive coolbox than in an electric coolbox. Depending on the initial temperature of your coolbox, the food can defrost within 24 hours. Therefore, you must plan your meals to ensure you consume the defrosted food within a safe time frame.
- Proper handling to prevent food poisoning – As the food defrosts, removing any water accumulating at the base of your coolbox is crucial. This step is essential to prevent cross-contamination and minimize the risk of food poisoning. Cleaning the coolbox regularly during your camping trip will help maintain a hygienic environment for your food storage.
4 – Convert a bucket or storage box into a coolbox
There are several ways to keep food cool, by using items from a home to make a temporary coolbox. Food must be in sealed waterproof bags for protection, and the bucket or storage box needs a lid.
Converting a bucket or storage box into a temporary cool box by:
- Lining with foil or emergency foil, leaving an overlay to cover the top of the food – place food inside with ice in bags or ice packs.
- Fill with cold water – ideally used just for storing drinks and storing food in secure waterproof bags.
- Dampen a towel and line the container – place food inside wrapped in newspaper as it is a natural insulator.
- Layer with sand, placing clay pots inside to store food.
For additional cooling, dampen a wet towel, lay it over the top, and store it in a cool area.
I have left my coolbox at home before. I converted a storage box that transported camping gear into a temporary coolbox—using frozen water bottles and newspapers for additional insulation.
5 – Camping with non-perishable foods: Convenience and stress-free meals
When it comes to camping, dealing with perishable foods can be challenging. Their limited shelf life and the need to maintain a specific temperature can cause stress and inconvenience. However, opting for non-perishable food items can simplify your camping experience and reduce worries about food spoilage, especially for short trips.
Benefits of non-perishable food
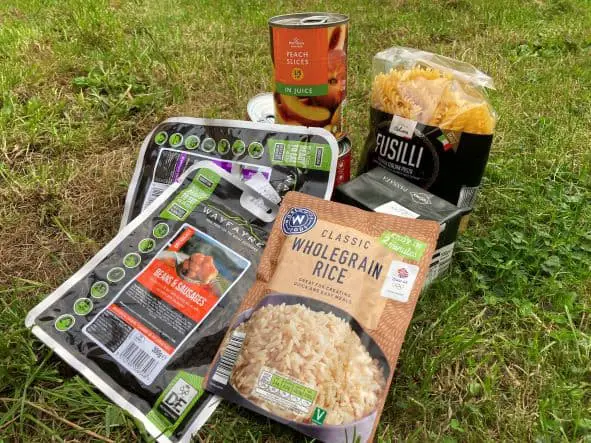
- Convenience – Non-perishable foods, such as tinned meats or fruit, coffee, tea, nuts, pasta, rice, and specially packaged camping food, offer convenience and ease of preparation. They have a long shelf life, require minimal refrigeration, and can easily store and transport.
- Stress-free meals – For quick and hassle-free meals during short camping trips, products like Wayfarer food packs are ideal. These all-in-one bags contain various meal options, including breakfast, chillies, and desserts. Heat them up, and you can enjoy a delicious and satisfying meal without extensive cooking or refrigeration. However, try before you go, as not all are great. My son loves the sausage and baked beans. We tried a chocolate brownie dessert, throwing it away as it tasted like cardboard.
- Perishable food considerations – While non-perishable foods can meet most of your camping needs, you may still require certain perishable items like milk, fresh fruit, or meats for BBQs. In such cases, buying these items from local stores or campsite shops daily or every two days is best to ensure freshness. Although it may interrupt your camping trip briefly, it helps prevent food waste and ensures the quality of your meals. Quite a few people have their shopping delivered directly to the campsite. Find out more ways to save money, reduce the food you throw away and help local businesses.
6 – Organizing your coolbox for maximum food cooling efficiency
Properly organizing your coolbox is key to keeping your food cool for extended periods during your camping trip. By planning your meals in advance, tracking contents, and strategically packing your coolbox, you can ensure that perishable items stay fresh and maintain a consistent temperature.
- Plan meals and pack accordingly – Create a meal plan for each day of your camping trip. Pack the coolbox in alignment with your meal plan, placing the food items needed for each day on top. This arrangement will prevent digging through the coolbox and disturbing other items when searching for specific ingredients.
- Utilize space efficiently – Pack small items into any available gaps within the coolbox to maximize cooling efficiency. Reducing the air space will help to keep food cold. Also, try to keep frozen food items in close contact with each other. This arrangement helps maintain a lower temperature for a longer time.
- Keep track of contents – If you have multiple coolboxes, keeping a list of the food stored in each one is helpful. Attach the list to the lid of each coolbox and cross off items as they are used. Number the coolboxes as “1” and “2,” matching them with your daily meal plan. This method allows you to quickly locate specific ingredients without opening unnecessary coolboxes.
- Assign coolboxes based on usage – Designate one coolbox (Coolbox 1) for items that require daily access. These may include perishable foods needed for immediate consumption. Use the second coolbox (Coolbox 2) for storing items that will remain fresh for a longer duration. By keeping Coolbox 2 closed as much as possible, you can maintain a lower temperature inside, thus preserving the quality of the food.
- Minimize 0pening and closing – Avoid frequent opening, closing, or leaving the coolbox open while searching for food to prevent unnecessary temperature fluctuations. Cool air escapes each time the coolbox is opened, and warmer air replaces it. By minimizing the time the coolbox remains open, you can extend the cooling effectiveness and keep your food colder for a more extended period.
7 – Creating layers and sections: An efficient way to organize your coolbox
Creating layers and sections within your coolbox can make a significant difference., when it comes to keeping your food cool and organized during camping or any outdoor adventure. Not only does it help maintain a consistent temperature throughout, but it also allows for easy access to specific items without disturbing the rest.
- Step 1 – Establish the base layer – Start by placing a layer of ice blocks at the bottom of your coolbox. This serves as a foundation for the first level of food items. Ensure there are no air gaps left to maximize the cooling efficiency. It is advisable to place food that you won’t need for the initial days on this layer.
- Step 2 – Repeat and insulate – Add another layer of insulation material and ice blocks on top of the first level of food. Repeat this process until you have arranged all your food items within the coolbox. Each layer should contain food items you will need at different trip stages.
- Step 3 – Convenient drink pocket while packing – consider the bottles of drinks you want to store. Create a designated pocket within the coolbox that provides easy and quick access to retrieve them without disturbing other food items. This ensures that you can grab a refreshing drink without having to dig through the entire contents of the coolbox.
- Step 4 – Top insulation for frequently used items -To maintain the cold air inside and make it more accessible, keep extra insulation material to lay over the top of the food layers. This way, the items you use frequently can be placed at the top, and you only need to pull back a small section of the cover at a time, minimizing the escape of cold air.
Cost-effective insulation solution – Insulation foil can be expensive, but there’s a budget-friendly alternative. Consider purchasing car windscreen insulation covers for under £1 each at a local store. These covers can be cut and shaped to fit the dimensions of your coolbox, providing an effective and affordable insulation solution.
8 – Using waterproof zip bags for cross-contamination prevention
To maintain the freshness of your food and prevent cross-contamination during camping trips. One effective method is using waterproof zip bags to store your food items. Using these bags can help preserve the quality of your food and prevent soggy messes.
- Preserve original packaging – When packing perishable items, leave them in their original sealed plastic wrappings. However, remove the food from cardboard boxes and place it inside sealable zip bags. This step is crucial to prevent the food from becoming soggy as it defrosts. Removing excess air from the bags before sealing them will also help maintain freshness.
- Extend freshness and prevent cross-contamination – Whether you’re storing meat, cheese, or milk bottles, adding an additional layer of protection is beneficial. Sealing these items inside waterproof zip bags provide an extra barrier against moisture and helps retain their freshness. Moreover, using separate bags for different food items prevents cross-contamination as they defrost and come into contact.
- Avoid water damage – Food left submerged in water at the bottom of a coolbox can quickly get ruined, leading to waste. Regularly emptying and cleaning the coolbox will help prevent water buildup. Waterproof zip bags add another layer of protection, ensuring your food remains dry and intact, even if water accumulates in the coolbox.
9 – Enhancing insulation with newspaper for extended cooling
To maximize the cooling capabilities of your coolbox and prolong the frozen time of your food, you can increase insulation by using simple materials like newspaper, insulated foil, or kitchen foil. These insulation techniques help maintain lower temperatures inside the coolbox, especially when frequent opening and closing occur.
- Individually wrap food – Before packing your coolbox, take the time to wrap each food item individually. You can use newspaper, insulated, or kitchen foil for this purpose. The additional layer of insulation created by wrapping the food helps maintain its temperature for longer, reducing the risk of premature defrosting.
- Utilize labels for easy identification – As you wrap the food items, it’s a good idea to label them. This simple step will make it easier to identify specific foods without the need for unnecessary unwrapping and searching. Clearly label each package with the contents and, if necessary, include any special instructions or cooking guidelines. This labelling system will streamline locating the desired food items, saving time and effort.
- Benefits of increased insulation – Adding extra insulation using newspaper, insulated foil, or kitchen foil creates an additional barrier against external temperatures. This helps to reduce heat transfer into the coolbox, keeping the interior cooler for a longer time. As a result, the frozen items within the coolbox will remain frozen for an extended period, even when the coolbox is frequently opened and closed.
10 – Choosing the right coolbox: Size and type for every camping trip
When purchasing a coolbox, we often assume that bigger is always better. However, it’s important to consider your camping trip’s specific needs before deciding.
- Assess your requirements – Before buying a coolbox, carefully evaluate the duration of your camping trip, the size of your group, and the amount of food you will need to store. For shorter trips, such as 1 or 2 nights, using a large 32L coolbox may not be necessary. Choosing a coolbox size that matches your needs is essential to avoid unnecessary space and weight.
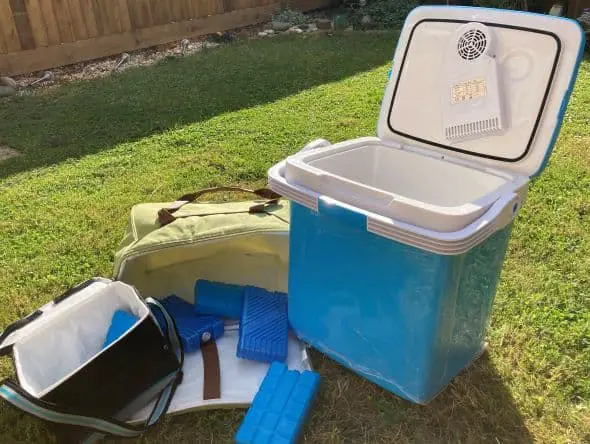
- Selecting the right type – Consider whether you require a passive or thermostatic coolbox based on your camping plans. A thermostatic coolbox is recommended for longer camping trips exceeding 2 nights as it provides electrical cooling capabilities. For shorter family camping trips, a 26L passive material coolbox is suitable. A compact 10L passive cool bag is also ideal for overnight adventures, whether wild camping, car camping, or backpacking.
- Benefits of multiple coolbox sizes – A collection of coolboxes with different designs and sizes offers significant advantages. It lets you choose the most appropriate coolbox for each trip, ensuring optimal food storage and cooling efficiency. By selecting a cooler that matches the duration and group size, you can save money by avoiding the need for excessive ice packs or bags of ice to fill space. This prevents food from defrosting too quickly and eliminates unnecessary expenses.
I have three cool boxes for different types of camping trips.
- 28L Thermostatic (Electrical) for camping for more than 2 nights
- 26L Passive Material cool box for up to 2-nights of family camping
- 10L Passive cool bag ideal for 1-night camping wild, car or backpacking
Need Help Choosing the Right Coolbox? If you’re unsure which coolbox to purchase, consider factors such as capacity and type (electrical or passive). To make an informed decision, refer to our comprehensive guide on buying a coolbox that suits your specific camping trip and group size. This guide will provide valuable insights and recommendations to help you select the perfect coolbox for your needs.
11 – Avoid direct sunlight: Protect your coolbox’s effectiveness
When preserving the coolness of your toolbox, it’s crucial to avoid leaving it in direct sunlight. The intense heat from the sun can significantly reduce its effectiveness, especially with hardshell cool boxes.
- Effect on coolbox performance – Direct sunlight exposes your coolbox to high ambient temperatures ranging from 15 to 25 degrees Celsius on average. Hardshell cool boxes, in particular, must work harder to maintain a temperature below this ambient level. The internal motor is forced to exert more effort, potentially leading to a shorter lifespan and decreased efficiency in maintaining desired temperatures.
- The importance of shaded areas – To ensure consistent temperatures inside your coolbox, keeping it in a shaded area is essential. Passive cool boxes are relatively easier to move around and position in different areas of your tent throughout the day, effectively avoiding direct sunlight. On the other hand, electrical cool boxes may pose more challenges due to cable restrictions.
- Using an extension cable – If necessary, you can use an extension cable to provide greater flexibility in positioning your electrical cool box away from direct sunlight. However, it’s important to note that using a standard household extension cord for outdoor use is not recommended.
12 – Using multiple coolboxes: An effective cooling strategy
Keeping food and drink separate and having two different coolboxes during camping trips is a game-changer.
- Divide and conquer – To ensure efficient cooling, divide your food items between multiple coolboxes. Use one coolbox specifically for main perishable foods that need to be kept cool, such as frozen meats, salads, or side dishes. The second coolbox can be designated for canned or bottled drinks and other non-perishable items that require frequent access.
- Affordable options – You don’t need to invest in expensive, high-quality coolboxes for both purposes. For the coolbox intended for drinks, a passive coolbox will be suitable. These coolboxes don’t require an electrical connection and can be more cost-effective. An electrical coolbox is recommended for food storage to ensure perishable items remain at the desired temperature.
In my camping setup, I use an electrical coolbox for storing perishable foods and a material passive cool bag for drinks. The passive cool bag is flexible and can easily be condensed for packing when it’s not in use. This setup allows me to maintain the freshness of perishable items while keeping the drinks separate and easily accessible.
Because I like to keep within a budget for my camping gear, for me, it is important to watch what I spend, this has allowed me to produce a list of the best budget passive camping coolboxes and electrical coolboxes. Read our reviews and see which is best for you and your family. If you are still unsure what coolbox you are looking for, we have a guide to the different types, sizes, and how they are powered that may help you.
13 – Maintain coolness on the go: Keep your coolbox chilled during travel
When you’re moving, ensuring that your coolbox stays cool is essential to preserve the freshness of your food and beverages. Whether you have a passive or electrical coolbox, here are some handy tips to help you maintain the cool factor while travelling.
- Shade is your friend – Keeping them away from direct sunlight is crucial for passive coolboxes. Instead of placing them in your vehicle’s hot and stuffy trunk, opt for a shaded area. Find a spot where the coolbox can stay protected from the scorching sun’s rays, such as the rear footwell of your car.
- Pre-cool your vehicle – Before embarking on your journey, take a few moments to cool down your car’s interior. Blast the air conditioning or roll down the windows to create a comfortable environment. Lowering the overall temperature inside the vehicle will help maintain a cooler atmosphere for your coolbox.
- Damp towel for passive coolboxes – To enhance the cooling efficiency of your passive coolbox, cover it with a damp towel while it rests in the rear footwell. The towel moisture helps lower the temperature inside the coolbox, providing an extra layer of insulation against external heat.
- Harness the power of 12V – Electrical coolboxes offer the advantage of running on 12V power, making them ideal for keeping your contents cool during travel. Simply plug the coolbox into your in-car charger or cigarette lighter socket, and let it do its magic while you’re on the move. This ensures a continuous supply of cooling power throughout your journey.
- Be mindful of battery drain – If you’re using your electrical coolbox while the car is not running, it’s important to exercise caution. Leaving the coolbox plugged in without the car engine running can drain your car’s battery rapidly. It’s best to disconnect the coolbox from the power source when the vehicle is not running to avoid unexpected battery issues.
Following these simple guidelines, you can ensure that your coolbox remains cool and refreshments stay refreshing throughout your travels. So, whether you’re embarking on a road trip or heading to a picnic spot, keep your coolbox in check and enjoy chilled treats without any worries.
14 – Increasing the insulation of an old coolbox
If you have an old coolbox that doesn’t provide sufficient insulation, there’s a simple and cost-effective way to upgrade it. Consider using thermal insulated shopping bags, easily found at local supermarkets. These bags are designed to keep groceries cool during transportation and can be a perfect solution for enhancing the insulation of your existing coolbox. Here’s how you can do it:
- Purchase thermal insulated shopping bags – Visit your local supermarket and look for thermal insulated shopping bags. These bags are typically made of durable, insulating materials and are designed to maintain the temperature of perishable items.
- Choose the right size – Select thermal bags that comfortably fit inside your coolbox. Consider the dimensions of your coolbox and choose bags that can be easily placed inside without leaving excessive gaps.
- Place the bags inside the coolbox – Once you have the thermal bags, open them up and carefully position them inside your coolbox. Ensure they cover the coolbox’s walls, bottom, and lid as much as possible. This will provide an additional insulation layer to keep the cold air trapped inside.
- Pack your coolbox as usual – After placing the thermal bags, you can pack your coolbox with food and ice packs as you normally would. The added insulation from the bags will help maintain lower temperatures for longer.
Using thermal insulated shopping bags is an affordable and convenient way to enhance the insulation of your old coolbox without purchasing a new one. It’s a temporary solution that can effectively extend the cooling capabilities of your existing coolbox until you find a suitable replacement.
Remember to regularly clean and maintain both the coolbox and the thermal bags to ensure proper hygiene and maximum insulation efficiency
Related questions
Monitoring food temperatures in a coolbox without a thermometer
When you are camping, you don’t have access to a thermometer. It doesn’t mean you can’t keep track of the temperature inside your coolbox. Here are a few alternative methods to monitor food temperatures.
- Use the ice block method -Place a dedicated ice block or a bottle of frozen water inside the coolbox alongside the perishable food items. Monitor the state of the ice block or water bottle throughout the day. If it remains frozen or partially frozen, it indicates that the temperature inside the coolbox is likely within the safe range. However, if the ice block or water bottle melts significantly, it may indicate that the coolbox is not maintaining a sufficiently low temperature.
- Feel for coolness – Regularly touch the exterior walls or surfaces of the coolbox to assess the temperature inside. If the walls feel noticeably cool to the touch, it suggests that the coolbox retains the cold and keeps the food chilled. However, if the exterior feels warm or at room temperature, it could indicate that the internal temperature is rising.
- Observe food condition – Keep an eye on the condition of the food inside the coolbox. If the perishable items remain firm, cold, and show no signs of spoilage, it suggests that the temperature inside is likely within the safe range. However, if you notice any changes in texture, odour, or discolouration of the food, it could indicate that the temperature has risen and the food may no longer be safe to consume.
- Time-based monitoring – If you have a general idea of how long it takes for your coolbox to lose its coolness, you can use a timer or set reminders to check the food at regular intervals. For example, if you know that your coolbox usually maintains its temperature for approximately six hours, you can plan to check the food every six hours to ensure it stays adequately chilled.
While these methods may not provide precise temperature readings, they can still give you a reasonable estimation of the coolbox’s effectiveness in keeping your food cold. Remember to follow proper food safety guidelines and discard any perishable items kept at unsafe temperatures for an extended period.
Coolbox cooling 101: Why warm ground and poor ventilation are a no-go
The placement of your coolbox plays a significant role in its ability to effectively keep your food and drinks cool. Here are some reasons why you should avoid placing your coolbox on warm ground and in a poorly ventilated area:
- Heat Transfer = Placing your coolbox directly on the warm ground allows heat to transfer from the ground to the bottom of the coolbox. This can significantly reduce its cooling efficiency and make it harder to maintain low temperatures inside.
- Increased temperature – Warm ground surfaces, such as asphalt or concrete, can absorb and radiate heat, increasing the ambient temperature around your coolbox. This can make it more challenging for the coolbox to maintain a lower temperature inside, especially on hot days.
- Insulation compromise – Placing a coolbox in a poorly ventilated area restricts airflow. Proper ventilation is essential for heat dissipation and a cooler environment inside the coolbox. The coolbox’s insulation can be compromised without adequate ventilation, leading to decreased cooling performance.
- Risk of food spoilage – When the coolbox is exposed to high ambient temperatures, it may struggle to keep the food and beverages at safe temperatures. This can increase the risk of food spoilage and potentially lead to foodborne illnesses.
Coolbox cooling made easy: Tips for optimal performance and food safety
To ensure optimal cooling performance and food safety, you need to ensure that you move your coolbox as the sun moves around your tent. Consider the following tips for placing your coolbox:
- Choose a shaded area – Select a shaded area where your coolbox will be protected from direct sunlight. This helps to minimize heat absorption and maintain cooler temperatures inside.
- Elevate the coolbox – Place your coolbox on a raised surface, such as a table or a cooler stand, to prevent direct contact with warm ground. This helps to reduce heat transfer and maintain insulation efficiency.
- Provide adequate ventilation – Ensure enough airflow around the coolbox by avoiding tightly enclosed spaces. Good ventilation helps dissipate heat and keeps the coolbox working effectively.
By avoiding warm ground and providing proper ventilation, you can enhance the cooling performance of your coolbox and keep your food and drinks at a safe and refreshing temperature during your outdoor adventures. it can be difficult if you have restriction on the length of yur extention lead for electrical cool boxes, which is what I often find. I always try t judge the different prosition when pitching my tent to avoid full sunlight.
